The Culinary Connoisseur
Pizza Cones
04
Dec
Dec
In Italy, where pizza was invented, it is made according
to strict traditions. The recipe must follow age old methods in order to be
called pizza. It must be made exclusively with Italian wheat flour, San Marzano
tomatoes and buffalo mozzarella. It must be made entirely by hand and never
rolled with a rollingpin. It must be very thin—no more than 1/8 inch thick and baked
in a wood fired oven. The colors of pizza–red for the sauce, white for the
cheese and green for the herbs—represent the colors of the Italian flag. Thankfully
we have no such restrictions here.
Interestingly, pizza originally did not
include tomatoes as early Europeans believed tomatoes to be poisonous. It
included herbs, spices and cheese toppings but no tomato sauce.
While “takeout” pizza is
certainly convenient for dinner when you’re in a rush, making pizza at home is
a treat to be shared with the whole family. The dough is simple and needs no
special equipment. The sauce can run the gamut from jarred to homemade or
somewhere in between.
certainly convenient for dinner when you’re in a rush, making pizza at home is
a treat to be shared with the whole family. The dough is simple and needs no
special equipment. The sauce can run the gamut from jarred to homemade or
somewhere in between.
Toppings to suit each member of your family will please
everyone. It’s also a wonderful way to warm up your kitchen on a cold winter evening.
everyone. It’s also a wonderful way to warm up your kitchen on a cold winter evening.
There are many easy pizza dough recipes that can be made entirely
by hand—no mixer required. The ingredients are stirred by hand in a bowl and kneaded
for just a few minutes on your countertop.
by hand—no mixer required. The ingredients are stirred by hand in a bowl and kneaded
for just a few minutes on your countertop.
There’s also no need to let is rise if you are in a rush;
just proceed with the recipe.
just proceed with the recipe.
You can use store-bought marinara or pizza sauce or make your
own sauce from scratch. We’ve come to a happy compromise between the two. Use a
can of tomato sauce and add your favorite seasonings and spices to make it your
own.
own sauce from scratch. We’ve come to a happy compromise between the two. Use a
can of tomato sauce and add your favorite seasonings and spices to make it your
own.
Cheese goes next—mozzarella is used most often but some
people add goat cheese or other soft cheeses. Finish with a variety of vegetables,
olives, or even anchovies.
people add goat cheese or other soft cheeses. Finish with a variety of vegetables,
olives, or even anchovies.
The best pizza features a crisp crust and soft interior.
This is best achieved at home by baking the pizza on a pizza stone. These large
flat ceramic stones mimic the stone floor of commercial pizza ovens. The stone retains
heat better than metal; it is also porous so air circulates and ensures a crisp
dough. These stones are available for a full-sized pizza or individual or
“personal pizzas.” Personal pizzas allow each family member to top their pizza
with their preferred add-ons.
Pizza can be traditionally flat, large and round or it
can take on new life as pockets, calzones or rolls.
can take on new life as pockets, calzones or rolls.
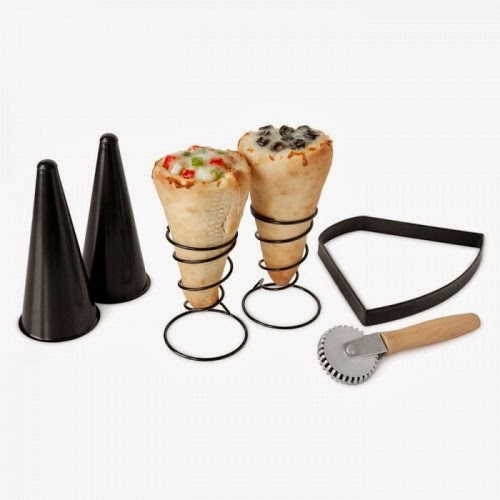
The newest take on pizza is the “pizza cone.” An
easily-held, cheesy, filled treat that will your family will love. Read on to
learn more.
easily-held, cheesy, filled treat that will your family will love. Read on to
learn more.
1 teaspoon instant dry yeast


1 cup warm water (milk or apple juice may be substituted)
1 tablespoon sugar
2 teaspoons coarse salt
1/3 cup oil
3 cups all purpose flour
1 15 ounce can tomato sauce or marinara sauce
1 lb shredded mozzarella cheese
Combine flour, sugar, salt and instant yeast in mixing
bowl. Add water and canola oil. Using the dough hook of an electric mixer, mix on
low speed for 1-2 minutes, or until dough comes together. You can also knead the
dough by hand. Begin by stirring the ingredients with a large spoon. When most
of the flour is incorporated turn dough out on your counter and continue
kneading by hand for 10 minutes.
Increase speed to medium-high and continue to mix for
another 4-6 minutes or until the dough is elastic.
another 4-6 minutes or until the dough is elastic.
Apply a thin coat of oil to the dough’s exterior. Place
in bowl, cover with plastic wrap and let rest for 45-60 minutes. Allowing the
dough to rest is not always necessary but it gives the gluten a chance to
relax, making it easier to roll out. But if you’re in a rush to get supper on
the table just continue as directed.
in bowl, cover with plastic wrap and let rest for 45-60 minutes. Allowing the
dough to rest is not always necessary but it gives the gluten a chance to
relax, making it easier to roll out. But if you’re in a rush to get supper on
the table just continue as directed.
Use a rolling pin to roll dough to approximately 1/8”
thickness. Press the cone cutter into the rolled out dough. Use your finger to
apply a little water to the edge of the dough. Fold dough over so the edges meet
and form a cone. Run the dough docker over the edge of the seam to close; flip
over the cone of dough and repeat on other side of seam. Let the cone rest on
the cutting board for 10-15 minutes.
Repeat process for remaining cones.
Preheat oven to 400°F. After dough has rested on the
cutting board for 10-15 minutes, slip dough over the cone mold and bake for 6-7
minutes, or until outer crust is just beginning to brown. Remove cones from
oven and cool for 2 minutes. Remove cone from mold and place into the pizza
cone holder. Fill pizza cone with seasoned tomato sauce or marinara, cheese and
your favorite add-ins. Return to the oven for another 8 minutes, or until
fillings are warm and bubbling. Let pizza cone rest a few minutes before eating.
NOTE: Pizza cone ingredients will settle while baking
in oven. Be sure to stuff ingredients to the brim of the cone before baking.
in oven. Be sure to stuff ingredients to the brim of the cone before baking.